
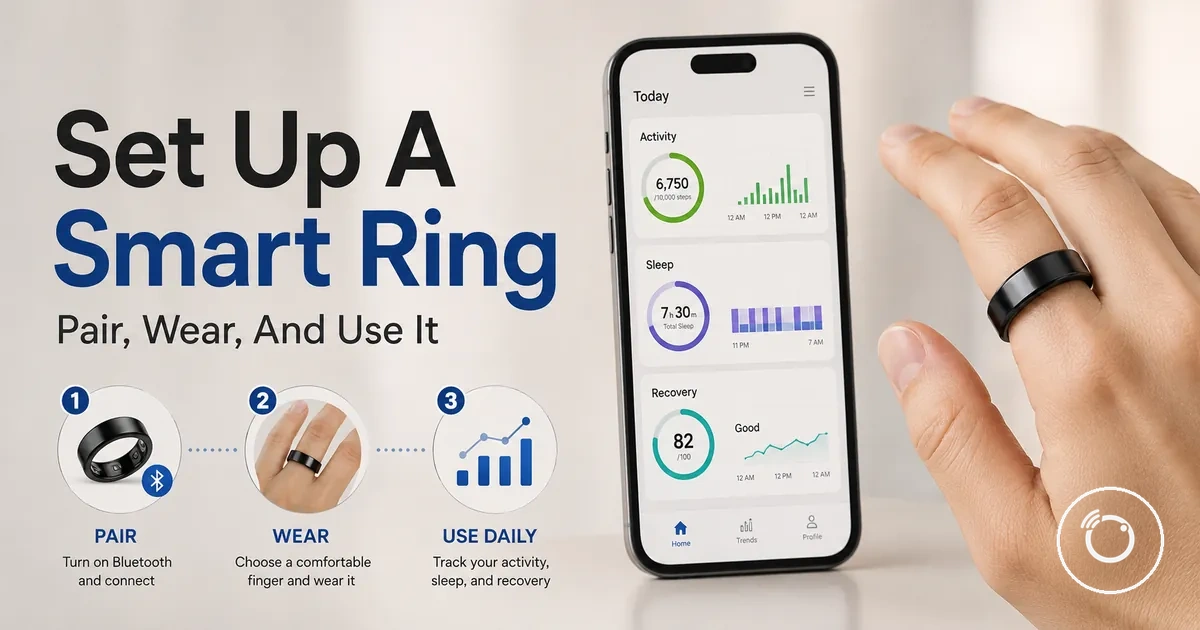
Fitness Smart Ring Setup and Everyday Use
A fitness smart ring produces useful daily data when it is set up correctly, worn with consistent sensor contact, charged as needed, and synced with its app. The core sequence is setup, wear, charge, and sync.
Most fitness smart ring models use an app and Bluetooth pairing for activation. App screens, permission categories, charger styles, battery indicators, and sync behaviour may differ by model, with status shown through the app, the charging case, or both; check the instructions for the ring in use.
Before pairing, prepare a compatible phone, enable Bluetooth, install the required app, keep the ring and charging accessory nearby, and confirm that the ring has enough power to complete setup. For broader guidance on buying, sizing, charging, and troubleshooting, see the fitness smart ring guide.
During daily use, a secure fit keeps the ring in contact with the finger, routine charging keeps it available for wear, and app permissions allow supported data to sync. This page focuses on setup and use, while detailed buying, sizing, charging, and troubleshooting decisions are covered elsewhere.
Before First-Time Fitness Smart Ring Setup
Preparation reduces pairing delays by confirming that each required item is ready before first-time setup begins. Before First-Time Fitness Smart Ring Setup verifies the fitness smart ring, charger, phone, app access, connection settings, and basic fit before pairing.
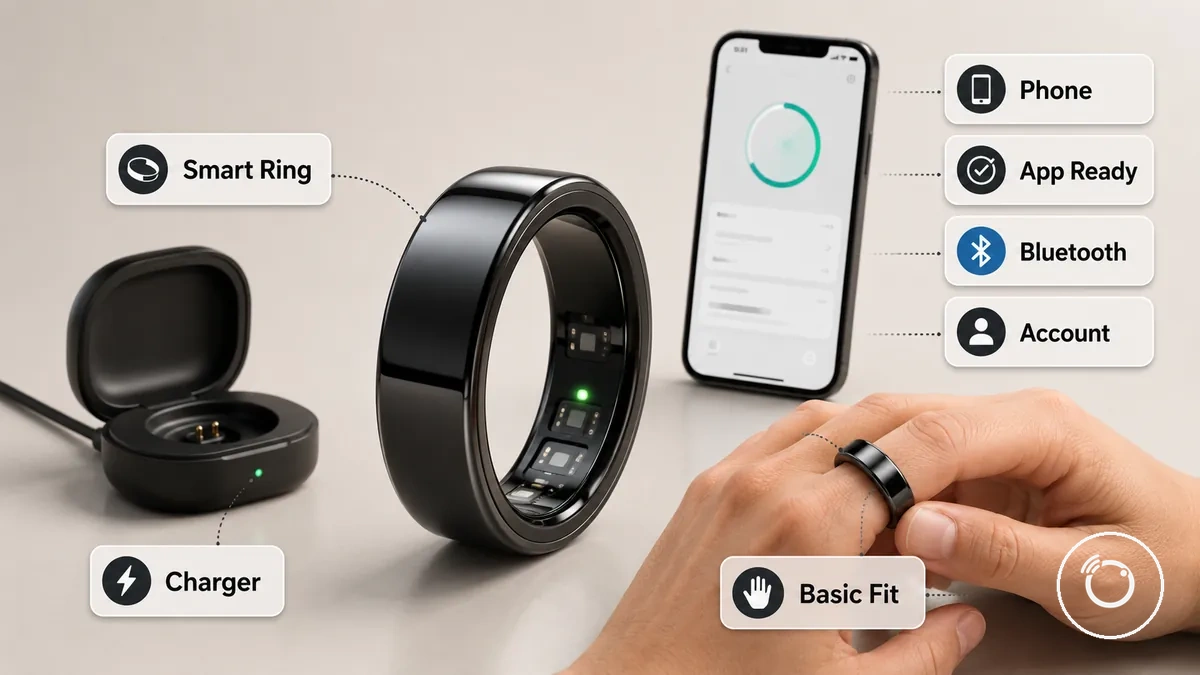
Model and phone requirements may include a dedicated account, internet access, supported app software, or permission prompts during setup. Check the ring instructions and the app screen for the stated phone requirements, account condition, and requested permissions before continuing.
- Fitness smart ring: Confirm that the intended ring is present and ready for activation, because a new or replacement ring must be selected as the correct device during setup.
- Charger: Keep the matching charger or charging case connected to power, because a ring with insufficient charge may need an initial charge before activation.
- Phone: Use a phone that meets the ring maker's stated app and operating-system requirements, because unsupported software may prevent pairing.
- App: Install and open the app specified for the fitness smart ring, because setup prompts and device controls are handled there.
- Bluetooth: Enable Bluetooth on the phone, because the ring and phone commonly use this connection for first-time pairing.
- Account and internet connection: Prepare the required account details and a working internet connection when the app requires sign-in or online activation.
- Basic fit: Confirm that the ring sits securely on the intended finger with consistent sensor contact, because a loose or obstructed fit can reduce contact during later wear.
For a new ring, begin with the app and charger ready. For a replacement ring, use the supported new-device or replacement-device option shown in the app; for an uncharged ring, complete the model's initial charging requirement before pairing.
Ring, Charger, Phone, and App Readiness
Ring, Charger, Phone, and App Readiness confirms that each required item is ready before the app is opened or Bluetooth pairing begins. Verify the ring charge, charging case, phone, app source, Bluetooth, and internet access before first-time setup.
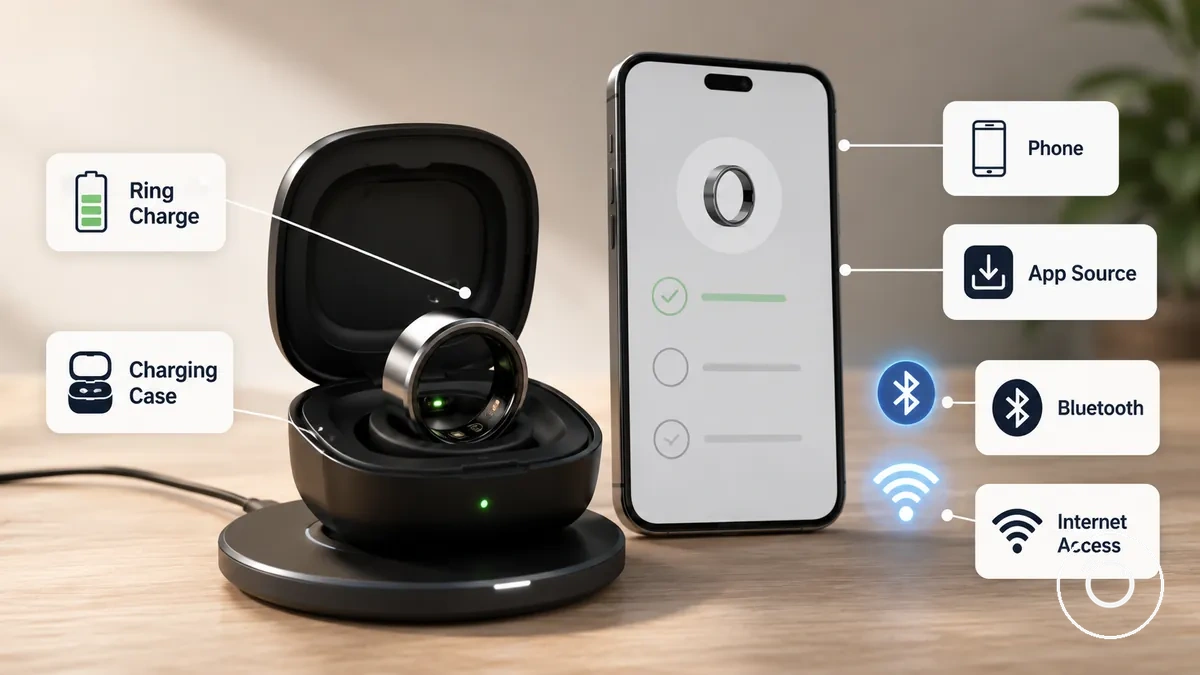
The required app name, setup prompt, account condition, and supported operating system are model-specific. Check the ring maker's stated phone and app compatibility criteria before continuing.
Ring, Charger, Phone, and App Readiness verifies the following items before pairing:
- Ring charge: Confirm that the ring has sufficient charge to complete activation without a power interruption.
- Charging case: Keep the matching charging case or dock connected to power so the ring can receive an initial charge when required.
- Phone: Confirm that the phone uses an operating-system version listed as supported for the required app.
- App source: Install the app from the source specified for the ring model so the correct setup prompt is available.
- Bluetooth: Enable Bluetooth and keep the phone nearby so the ring can be detected during pairing.
- Internet access: Use a working internet connection when account sign-in or an online setup prompt is required.
Basic Fit Check Before Pairing
Basic fit should be checked before pairing so tracking starts with stable sensor contact against the skin. Confirm basic fit through finger choice and comfortable snugness before setup because a ring that shifts easily may reduce consistent contact.
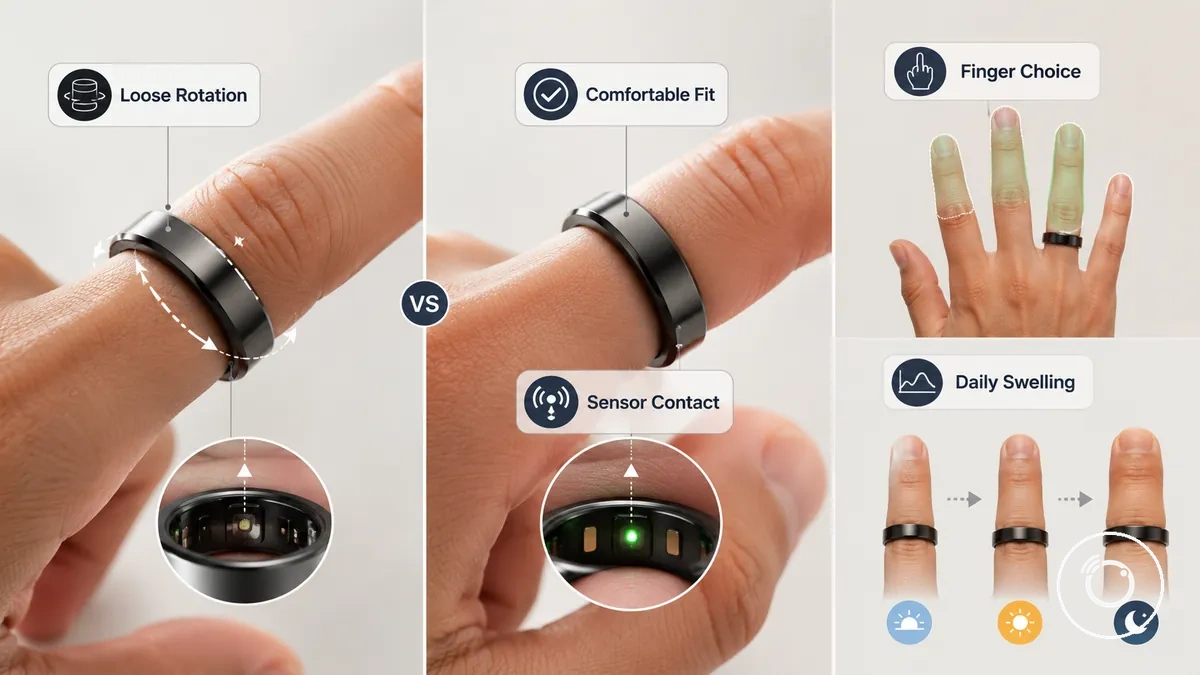
A loose ring that rotates freely around the finger is more likely to lose steady contact than a snug but comfortable ring that stays in position during normal wear. Minor daily swelling may change how the ring feels, so the ring should remain comfortable without excessive pressure. For more detailed guidance, see fit and finger placement.
Basic Fit Check Before Pairing verifies these fit conditions before setup:
- Finger choice: Select the intended finger and confirm the ring stays secure during normal movement.
- Snugness: A comfortable ring should remain stable without creating excessive pressure, helping maintain skin contact.
- Rotation: Frequent rotation is a sign of a loose fit and may reduce consistent tracking.
- Swelling: Check comfort during normal daily wear because minor swelling can increase ring pressure.
- Sensor contact: Confirm the fitness smart ring maintains steady contact with the skin before pairing to support a stable tracking start.
First-Time Setup in the Smart Ring App
First-time setup starts in the smart ring app, where the fitness smart ring is activated and connected through an app-led setup sequence. Download the app, complete account creation, prepare the ring for activation, and follow the setup screen until the ring is connected. This general order remains similar even though app screens differ between brands.
App names, setup screens, and prompts vary by model, so the wording and layout you see may not exactly match another smart ring. Follow the prompts displayed in your smart ring app while using the ordered sequence below as the general first-time setup flow.
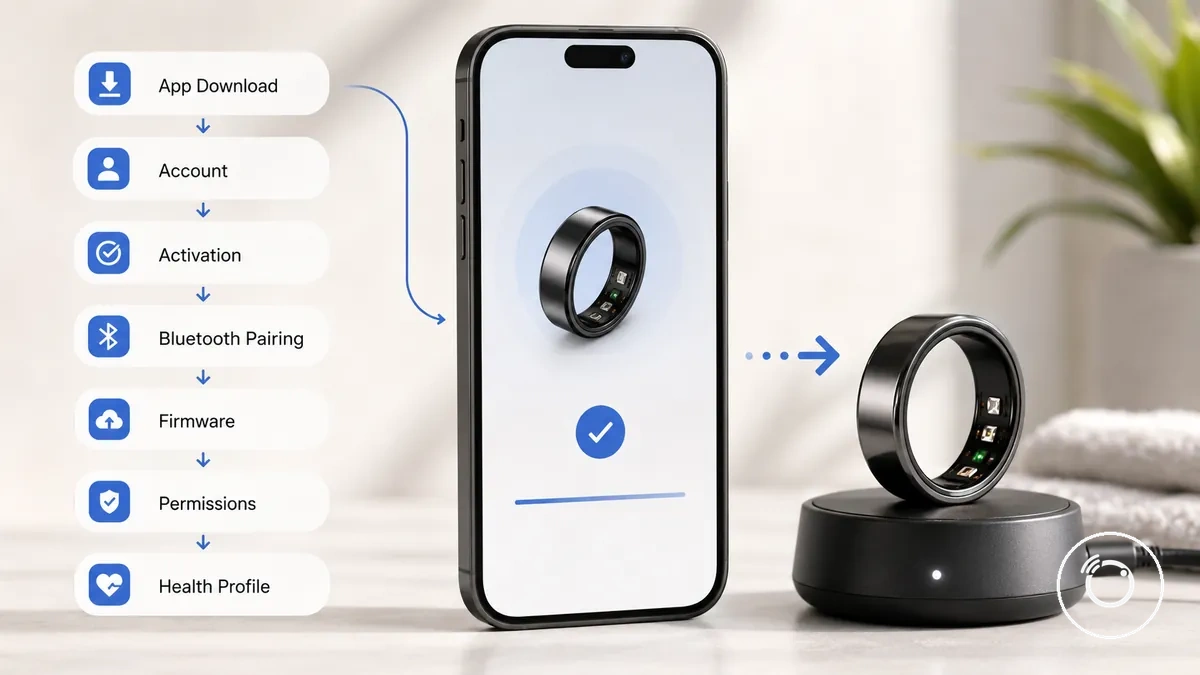
- Download the smart ring app. Install the app recommended for your ring model and open it. Look for the welcome or setup screen, although its appearance may differ by brand.
- Complete account creation. Sign in or create an account if requested. Continue when the app confirms that your account is ready for first-time setup.
- Prepare the ring for activation. Place the ring on its charger or follow the activation step shown in the app. Continue when the app indicates that the ring is ready to connect.
- Keep the phone nearby. Leave the phone close to the ring during setup. When the pairing flow begins, the app should display a nearby device ready for Bluetooth pairing.
- Confirm Bluetooth pairing. Approve the Bluetooth pairing confirmation prompt when it appears. Some models may display an additional confirmation screen before the connected ring status appears.
- Review any firmware prompt. If a firmware prompt appears, allow the update to finish before continuing. If no firmware prompt is shown, continue to the next setup screen.
- Review permissions and health profile. Allow the requested permissions and complete the available health profile fields if the app requests them. The visible profile setup fields may differ by model.
If the first setup attempt repeatedly fails to pair or reconnect, continue with the dedicated troubleshooting guidance after completing this initial setup sequence instead of repeating the same steps.
Downloading the Correct App and Creating the Account
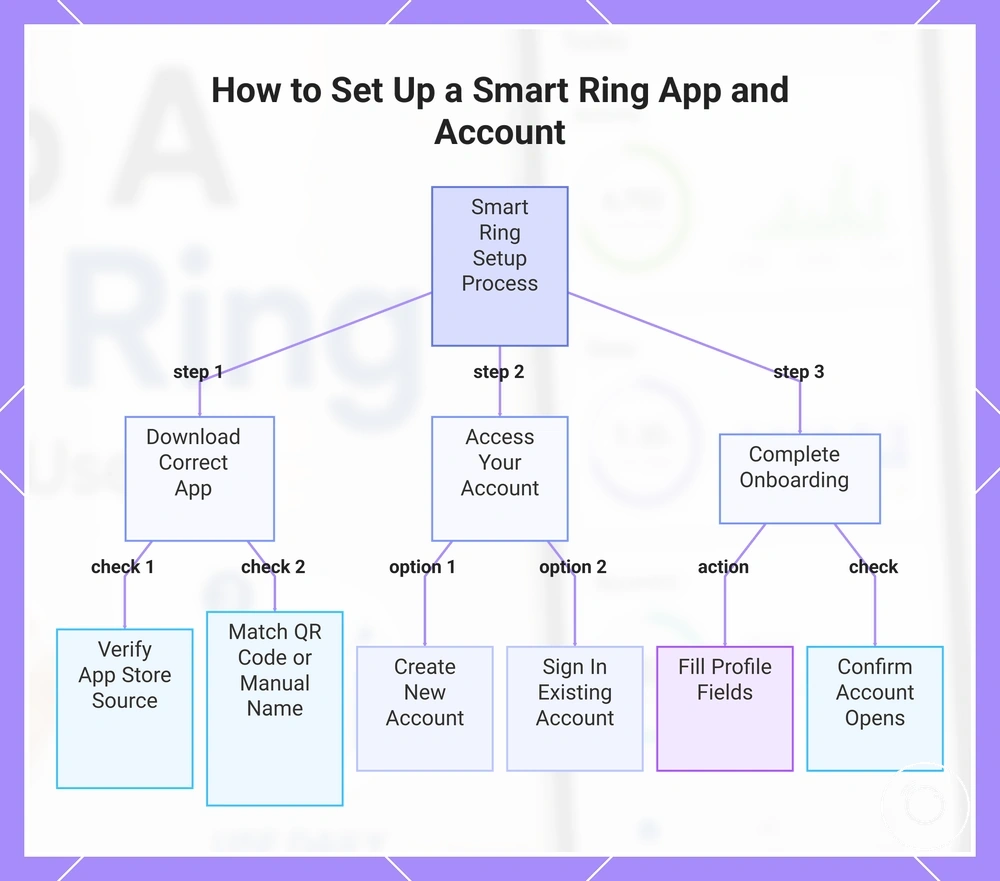
The correct app manages smart ring setup and data review, so choosing the right one before creating an account helps avoid installing an unrelated app. Verify the app source by matching the app store listing with the QR code supplied with the ring or the manual app name before continuing.
If you are setting up a replacement ring or using a changed phone, you may be able to continue with your existing account instead of creating a new one. Follow the sign-in option shown by the app because available login methods and region requirements can differ by app.
- App store: Download the correct app from the supported app store for your device. Check: Confirm the app name matches the ring documentation or QR code. Reason: This helps avoid selecting an unrelated app.
- QR code or manual name: Scan the QR code if provided, or verify the manual app name. Check: Compare both sources when both are available. Reason: Matching information improves correct app identification.
- Account: Create an account or sign in with an existing account. Check: Complete any required sign-in method and follow any region requirement displayed by the app. Reason: Account access is required before onboarding can continue.
- Profile fields: Complete the requested profile fields during onboarding. Check: Enter only the fields presented by the app. Reason: Basic profile information prepares the account for data review.
- Replacement ring: If you have a replacement ring or a changed phone, sign in with the same account when available. Check: Confirm the account opens successfully before continuing. Reason: Existing account access may allow setup to continue without creating another account.
This chart outlines the three main steps to correctly download the app and create or sign in to your account, including key checks to avoid errors.
Pairing the Ring with Bluetooth
Bluetooth pairing begins when the ring is ready, the nearby phone is close to the ring, and the app displays the app prompt. Bluetooth pairing usually takes place inside the app, although some models may briefly open the phone Bluetooth settings, while others pair only through the app.
- Prepare the ring. Place the ring in its charging or activation state if the app requests it.
- Start pairing mode. Follow the app prompt to place the ring into pairing mode when your model requires this step.
- Select the ring. Choose the detected ring from the device selection screen when it appears.
- Approve the connection. Accept the confirmation prompt until the app displays the connected ring status.
- Complete Bluetooth pairing. Finish Bluetooth pairing inside the app, or use the phone Bluetooth settings first only if your model instructs you to do so.
If the ring does not appear during device selection or repeatedly disconnects after pairing, continue with the dedicated troubleshooting guidance instead of repeating the same Bluetooth pairing sequence.
Setting Permissions and Health Profile Details
Permissions and health profile details determine which information the smart ring app can record, sync, and use for personalization. Permission requests and profile fields may differ by phone, app, or platform, so review each prompt before continuing. These settings affect recording, syncing, and personalization throughout the initial setup.
Review the requested settings before completing setup.
| Setting or field | Value or access | Why it matters |
|---|---|---|
| Notification permission | Allow app access to notifications when prompted | Enables supported notification features inside the app. |
| Bluetooth permission | Allow Bluetooth permission | Lets the app communicate with the smart ring for recording and syncing. |
| Location permission | Grant location permission only if the phone or app requests it for scanning | May be required for device discovery during setup on some platforms. |
| Health-platform sharing | Enable data sharing if you choose to connect a supported health platform | Allows supported health data to sync between connected apps. |
| Health profile | Enter requested profile fields such as age, height, weight, sex, sleep schedule, and activity preferences | Provides profile details the app may use for tracking and personalization. |
Wearing a Fitness Smart Ring for Reliable Tracking
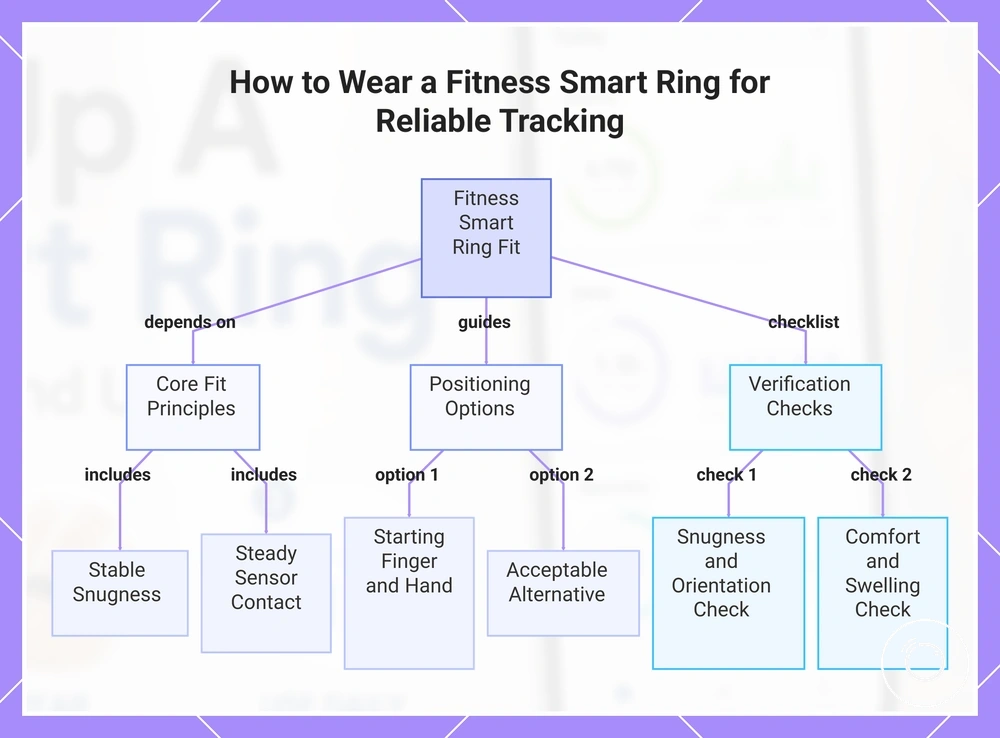
Wear the fitness smart ring with a stable fit that keeps the inner sensors in consistent contact with the finger without creating uncomfortable skin pressure. The ring should resist unnecessary movement during normal hand use while remaining comfortable enough for daily wear. Reliable tracking therefore depends mainly on balanced snugness and steady sensor contact.
Good starting option: Begin with a finger and hand where the ring sits securely during walking, sleeping, and routine tasks without rotating freely or pressing into the skin. A finger that maintains stable contact during ordinary movement is a practical starting choice, while the preferred hand can reflect comfort, dominant-hand use, and work habits.
Acceptable alternative: Move the ring to another suitable finger or hand when swelling, repeated movement, gripping tasks, or pressure makes the original position less comfortable. The alternative position should still provide a stable fit and maintain sensor contact rather than allowing the ring to slide or spin.
Use this checklist to verify that fit and sensor contact support comfortable daily wear and consistent readings:
- The ring has enough snugness to stay in position without rotating freely.
- The sensor area remains against the underside of the finger when the model requires a specific orientation.
- Normal hand movement does not cause the ring to slide across the finger.
- Daily wear remains comfortable without persistent pinching or concentrated skin pressure.
- Temporary swelling does not make the ring difficult to remove or uncomfortable to keep on.
- The chosen finger and hand suit routine work, sleep, and activity without frequent repositioning.
- An alternative finger provides similar sensor contact when comfort or work habits require an adjustment.
This chart shows the core fit principles, positioning options, and verification checklist for achieving reliable tracking with a fitness smart ring.
Choosing the Finger and Hand for Daily Wear
A non-dominant hand is a practical starting point for daily wear because it may experience less movement during routine tasks. The index finger, middle finger, or ring finger can each be suitable when the finger shape supports comfort and sensor stability. If another finger feels more comfortable during everyday use, adjust the wearing position to match your routine.
The points below compare practical factors when choosing a finger and hand:
- A non-dominant hand may reduce movement during common work tasks, helping the ring remain in a stable wearing position.
- Choose a finger whose shape supports a secure fit and consistent sensor stability throughout normal activities.
- The index finger, middle finger, and ring finger are all practical starting options when they feel comfortable.
- If your dominant hand performs frequent gripping or repetitive work, the opposite hand may provide a more comfortable wearing experience.
- If a different finger provides better comfort than the common starting point, it is an acceptable alternative when the ring remains stable during regular wear.
Keeping the Ring Snug Without Pressure
If the ring slides or rotates frequently, adjust the fit or wearing position until it stays secure without feeling tight. A snug fit supports comfort and stable daily readings by keeping the ring in place without creating excessive pressure.
If swelling, overnight changes, pressure marks, numbness, or discomfort develop, move the ring to another finger if that improves comfort. Remove the ring if pressure, irritation, or discomfort continues after adjustment, rather than continuing to wear it.
The points below distinguish a secure fit from excessive tightness:
- Do: Keep the ring snug enough to reduce sliding and unnecessary rotation.
- Do: Move the ring to another finger if swelling or overnight changes make the current position uncomfortable.
- Do: Check that the ring remains comfortable during normal daily activities.
- Do: Remove the ring if persistent pressure, irritation, or discomfort continues.
- Do not: Wear the ring so tightly that it leaves lasting pressure marks.
- Do not: Ignore numbness or ongoing discomfort while wearing the ring.
- Do not: Keep using the same finger when another finger provides a more comfortable and stable fit.
Maintaining Sensor Contact During Normal Movement
Keep the ring positioned so sensor contact with the skin remains steady during normal movement. If movement causes rotation or gaps, signal quality may decrease and readings may contain missing data, so re-seat the ring when its position changes.
The checks below connect each movement condition with its contact issue and practical response:
- During everyday hand motion, condition: the ring rotates; contact issue: the sensor position shifts away from its usual skin contact area; check: re-seat the ring before continuing normal use.
- During workouts, condition: repeated movement creates a gap; contact issue: sensor contact becomes intermittent; check: reposition the ring when it starts moving around the finger.
- During chores, condition: gripping and repeated hand motion turn the ring; contact issue: the contact area no longer sits in its usual position; check: re-seat the ring after the task.
- With a loose fit, condition: extra movement allows rotation and gaps; contact issue: signal quality may become less stable; check: restore the ring to its normal position before relying on later readings.
- On models with a visible sensor window, condition: the window rotates away from the usual skin contact area; contact issue: contact may become inconsistent; check: rotate the ring back to the intended sensor position.
Using the Ring Across Sleep, Activity, and Daily Routines
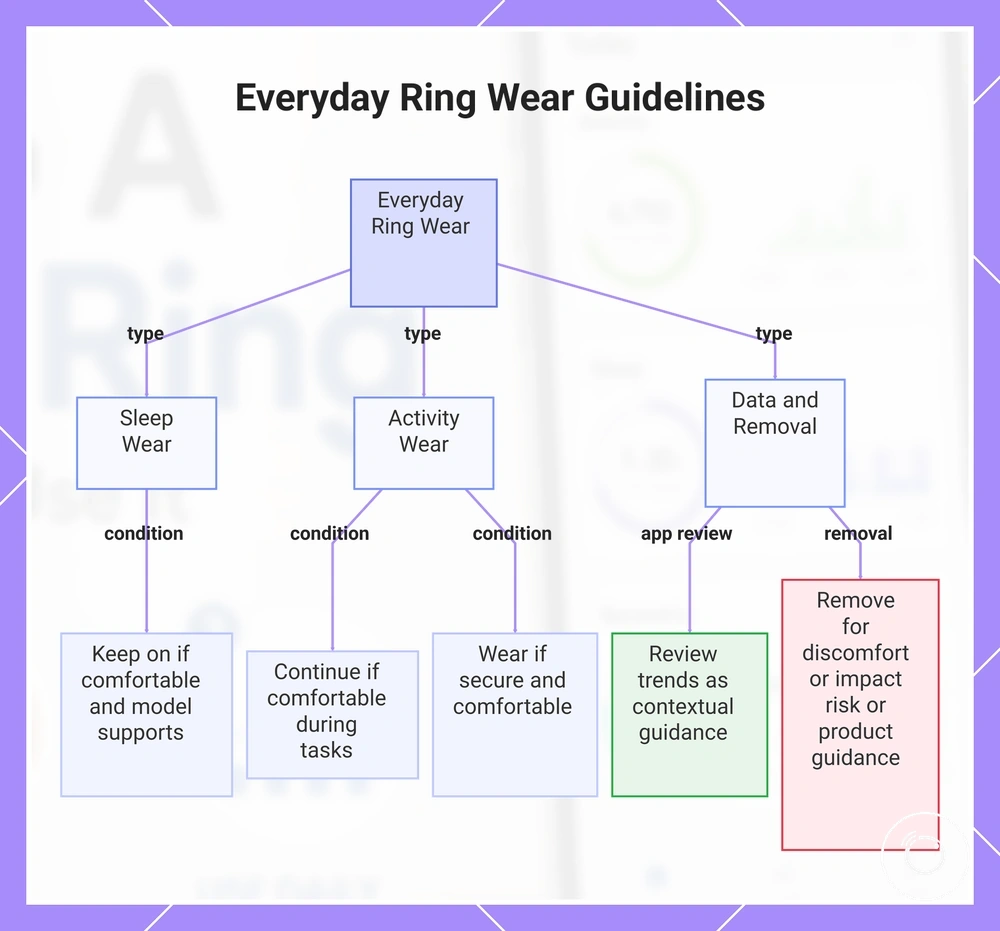
An ordinary day may include overnight wear, a workday with regular hand movement, and a planned exercise session. The ring can remain part of these daily routines when wear stays comfortable and the device is used consistently across the periods the user wants to review. Ordinary wear is consistent but flexible, with removal based on comfort, activity demands, and device guidance.
For sleep wear, keep the ring on overnight when it remains comfortable and the model supports overnight use, as this may provide overnight data for later review. During daytime activity and workouts, wear the ring through normal movement when the activity allows comfortable use, while treating exercise information as a routine record rather than a diagnostic outcome.
Use app check-ins to review recent activity, sleep summaries, readiness, and recovery as model-generated guidance rather than guaranteed measures of health or improvement. Sensible removal moments include persistent discomfort, activities that expose the ring to impact or damage, and situations where the manufacturer advises removal. The checklist below organises everyday wear across sleep, activity, workouts, app review, and removal moments.
- Overnight wear: Use sleep wear when the ring remains comfortable and overnight use is supported by the model.
- Morning review: Check sleep information, readiness, or recovery in the app as contextual guidance for the day.
- Workday routine: Continue daytime wear through ordinary movement when the ring remains comfortable during tasks.
- Exercise sessions: Wear the ring during workouts when the activity allows secure and comfortable use.
- App check-ins: Review trends at practical intervals instead of treating one reading as a complete assessment.
- Removal moments: Remove the ring when discomfort persists, impact risk is high, or product guidance calls for removal.
This chart shows when to wear the ring during sleep, activity, and workouts, and how to review data and know when to remove it.
Charging a Fitness Smart Ring During Routine Use
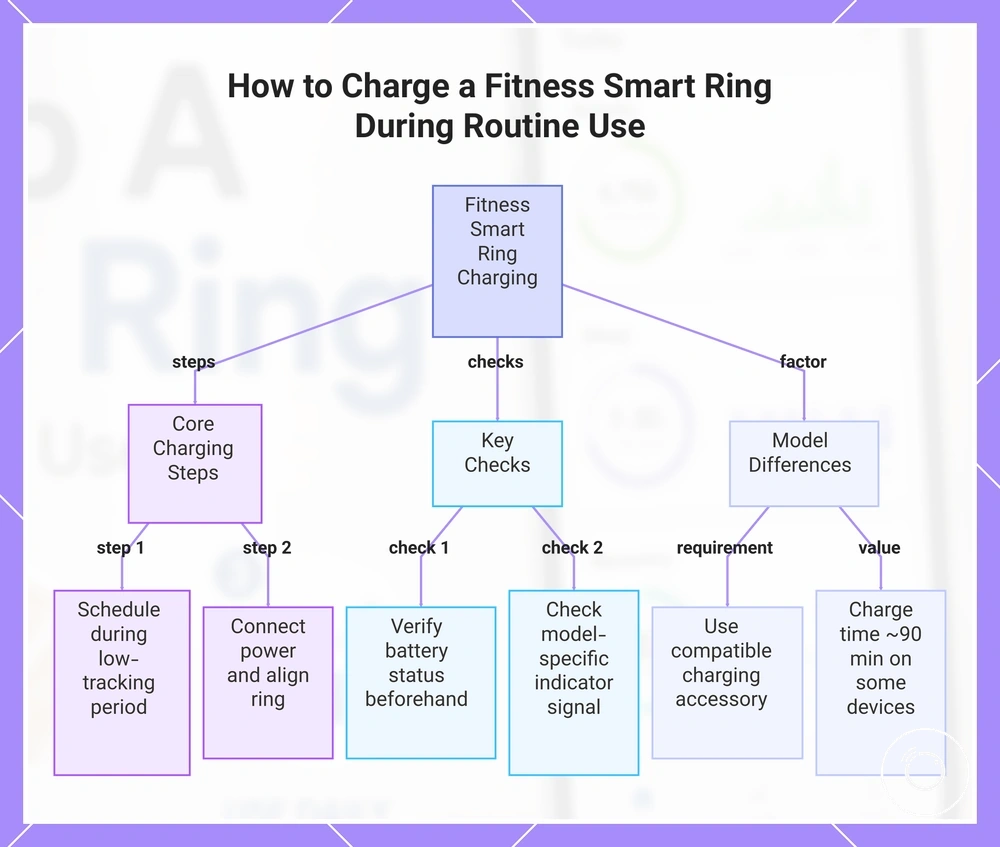
Charge the fitness smart ring with its charging case or dock, using the compatible cable and a suitable USB power source. Check the alignment and charging indicators before leaving the ring to charge, as indicator behaviour can differ between models. To reduce interruptions to routine use, schedule the charge cycle during a shower, desk break, or another low-tracking period.
Charging accessories, indicator meanings, and charge timing differ by model, and a full charge may take around 90 minutes on certain devices rather than every fitness smart ring. Use the charging accessory intended for the ring model, because compatibility and safe charging guidance are model-specific and should not be assumed for other chargers.
- Check battery status: Review the battery status in the app or on a supported display, noting that the battery check method may differ by model.
- Prepare the charging accessory: Place the charging case or dock on a stable, dry surface and confirm it matches the ring model.
- Connect power: Attach the compatible cable to the charging accessory and a suitable USB power source, then confirm the connection is secure.
- Align the ring: Position the ring so the charging contacts or alignment marks match the charging case or dock. For more detailed guidance on charging a fitness smart ring, see the dedicated battery and charging guide.
- Confirm charging: Check the charging indicators for the model-specific signal that the charge cycle has started, such as a light, display, or app notification.
- Finish the charge: Allow the ring to charge until the intended battery status is reached, remembering that total charge time may differ between models and approximately 90 minutes is only an example for certain devices.
This chart shows the main charging steps, key checks, and model-specific considerations for charging a fitness smart ring during daily use.
Using the Charging Case, Dock, or Cable
Use the charging case, dock, or cable intended for the ring’s charging accessory style. The setup clarifies the required alignment and the location of the contact pins or other clean dry contact points.
- Check the contacts: Confirm that the ring and charging accessory have clean dry contact points before connecting power; do not place wet surfaces against the charger.
- Position the ring: Align the ring with the contact pins or required dock position so the charging surfaces meet correctly.
- Close or secure the accessory: Close the charging case lid when the model requires lid closure, or confirm that the ring remains seated on the dock.
- Connect USB power: Attach the compatible cable to the charging accessory and its supported USB power source, then check for the model-specific charging cue.
- Verify recognition: If the ring is never recognized or never begins charging after the alignment and power connection are checked, move to troubleshooting rather than repeating the setup attempts.
Checking Battery Status and Charging Indicators
Check battery status by reviewing the app battery percentage, charging indicators on the accessory, or a notification from the companion app. These battery-status signals help verify whether the ring is charging, has reached full charge, or needs charging again, while LED patterns and notifications remain model-dependent.
| Indicator source | Signal or value | Likely status | User action |
|---|---|---|---|
| App battery percentage | A rising percentage, a high displayed level, or a low displayed level | A rising value usually indicates charging, a high value may indicate full charge, and a low value may indicate low battery according to the app's model-specific thresholds | Continue charging while the percentage increases, remove the ring when the intended level is reached, or begin charging after a low-battery indication |
| Accessory LED | A steady, pulsing, flashing, or colour-changing LED pattern | The LED pattern may represent charging, full charge, or a connection state, but its meaning differs between models | Compare the observed charging indicators with the model-specific guidance before disconnecting or repositioning the ring |
| Notification | A charging, fully charged, or low-battery notification | The notification may confirm the current battery status when the ring and app remain synchronised | Follow the notification, then confirm the battery status in the app if further verification is needed |
| Missing indicator | No LED activity, app percentage change, or notification after connection | The charging state remains unconfirmed | Recheck the charging connection and ring alignment before moving to troubleshooting if no charging signal appears |
Syncing Data After Charging or Daily Wear
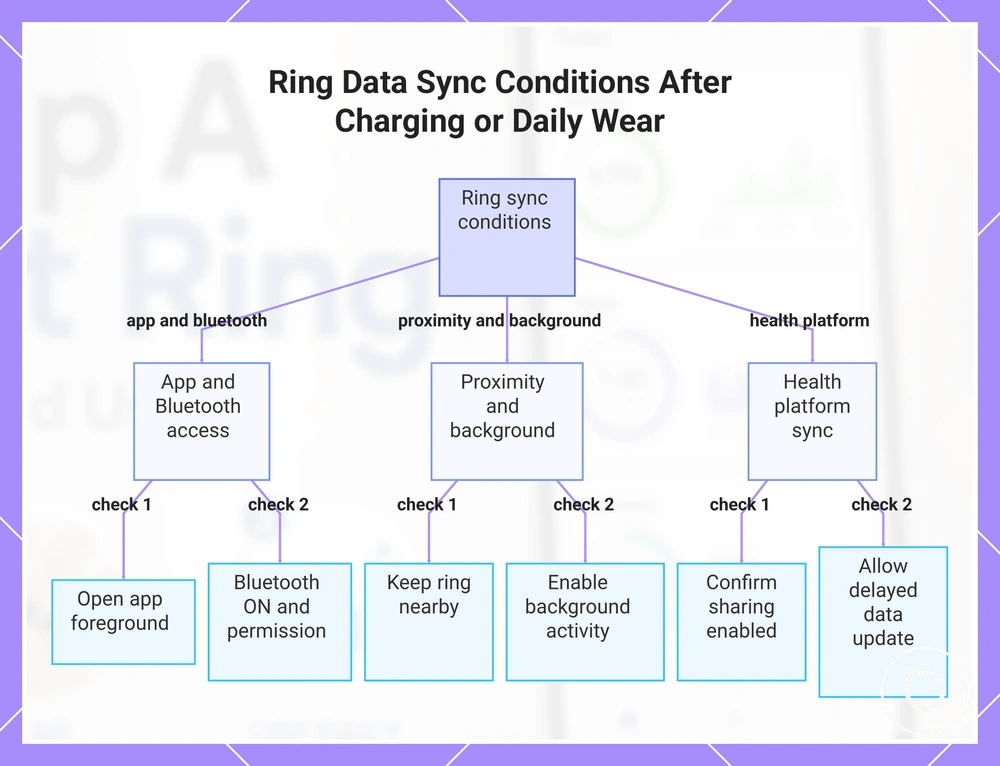
Syncing moves ring data collected during daily wear or charging into the app when the ring reconnects to a nearby paired phone. Open the app with Bluetooth access available so recent sleep, activity, and recovery records can upload or refresh. The data update may not be instant when the ring has stored a longer period of readings or the app has not been active.
Routine syncing is more likely to continue when background permissions remain enabled and the phone allows the app to communicate with the ring. Health-platform sync occurs only when sharing has been enabled, and delayed data in the connected health platform may appear after the ring app completes its own update. Use this checklist to verify the conditions needed for a normal post-wear or post-charge sync:
- Open the app: Bring the ring app to the foreground so it can request the latest stored ring data.
- Keep the phone nearby: Place the ring near the paired phone during the update so the Bluetooth connection remains available.
- Confirm Bluetooth access: Check that Bluetooth is on and that the app retains permission to communicate with the ring.
- Allow background permissions: Enable permitted background activity when the app supports updates outside the foreground.
- Check health-platform sync: Confirm that sharing remains enabled when ring data should also flow to a connected health platform.
- Allow delayed data to update: If overnight data is missing or activity updates are delayed, keep the ring nearby and leave the app open while the refresh completes before treating the data as unavailable.
This chart shows the key conditions and checks needed to ensure a successful ring data sync after charging or daily wear.
Setup, Wear, and Sync Mistakes That Affect Tracking
When tracking quality drops or readings are missing, setup mistakes, wear mistakes, or sync mistakes are common first-line causes. A wrong app or incomplete pairing can interrupt data transfer, while low battery, loose fit, or poor sensor contact can reduce data collection or delivery. Treat these conditions as first checks rather than proof of a permanent fault.
Escalate beyond routine checks when the same tracking issue continues after the app, pairing state, fit, battery status, permissions, and phone connection have been verified. Repeated missing readings or delayed sync may require deeper support, so use the dedicated guide to fix tracking or syncing issues when the problem persists.
The diagnostic checklist separates each likely cause from the first safe check and the point at which further troubleshooting becomes appropriate.
| Mistake or symptom | Likely cause | First safe check | When to escalate |
|---|---|---|---|
| Wrong app or no ring data after setup | The installed app may not support the ring model, preventing the expected device connection and data flow | Confirm the app name and supported ring model against the manufacturer’s setup information | Escalate when the correct app still cannot identify the ring |
| Incomplete pairing | The setup connection may not have completed, leaving the ring without an active paired state in the app | Check whether the ring appears as connected inside the app rather than relying only on the phone’s Bluetooth list | Escalate when the app repeatedly fails to complete pairing through the normal setup sequence |
| Low battery and interrupted updates | A low battery state can interrupt normal data collection or transfer | Check the app battery status or charging indicator and charge the ring when a low battery state is shown | Escalate when the ring remains unresponsive after a confirmed charging attempt |
| Loose fit or missing readings | A loose fit can create inconsistent sensor contact when the sensing surface moves away from the skin | Confirm that the ring sits securely and that the sensor area maintains comfortable skin contact | Escalate when readings remain consistently absent with stable contact and the recommended fit |
| Disabled permissions or app not opened | Disabled permissions can block Bluetooth communication or background data activity, while an unopened app can delay the next update | Open the app and confirm that its required Bluetooth and background permissions are enabled | Escalate when permissions remain enabled but repeated updates still do not appear |
| Bluetooth off or delayed sync | The ring cannot transfer stored data while Bluetooth access is unavailable, and queued data may appear after the connection resumes | Turn Bluetooth on, keep the ring near the paired phone, and allow the app to refresh | Escalate when delayed sync persists across repeated connection attempts |